Big Little Ant

不被嘲笑的梦想,是不值得去实现的

when

可以使用when做条件判断

1
2
3
4
tasks:
- name: "shut down Debian flavored systems"
command: /sbin/shutdown -t now
when: ansible_facts['os_family'] == "Debian"

同时我们可以使用 or 来指定多个条件语句

1
2
3
4
5
6
7
8
9
10
11
12
13
14
15
16
tasks:
- name: "shut down CentOS 6 and Debian 7 systems"
command: /sbin/shutdown -t now
when: (ansible_facts['distribution'] == "CentOS" and ansible_facts['distribution_major_version'] == "6") or
(ansible_facts['distribution'] == "Debian" and ansible_facts['distribution_major_version'] == "7")
````

我们可以写多行来实现and的情况

```yaml
tasks:
- name: "shut down CentOS 6 systems"
command: /sbin/shutdown -t now
when:
- ansible_facts['distribution'] == "CentOS"
- ansible_facts['distribution_major_version'] == "6"

假设我们要忽略一个语句的错误,然后根据成功或失败决定有条件地执行某项操作

1
2
3
4
5
6
7
8
9
10
11
12
13
14
tasks:
- command: /bin/false
register: result
ignore_errors: True

- command: /bin/something
when: result is failed

# In older versions of ansible use ``success``, now both are valid but succeeded uses the correct tense.
- command: /bin/something_else
when: result is succeeded

- command: /bin/still/something_else
when: result is skipped

var 可以使用 ‘yes’, ‘on’, ‘1’, ‘true’ 这些值设置bool值,然后进行规制判断。

1
2
3
vars:
epic: true
monumental: "yes"
1
2
3
tasks:
- shell: echo "This certainly is epic!"
when: epic or monumental|bool
1
2
3
tasks:
- shell: echo "This certainly isn't epic!"
when: not epic

可以判断当前变量是否定义来执行相应的条件

1
2
3
4
5
6
tasks:
- shell: echo "I've got '{{ foo }}' and am not afraid to use it!"
when: foo is defined

- fail: msg="Bailing out. this play requires 'bar'"
when: bar is undefined

when函数可以结合loop函数一起使用

1
2
3
4
tasks:
- command: echo {{ item }}
loop: [ 0, 2, 4, 6, 8, 10 ]
when: item > 5
1
2
3
- command: echo {{ item }}
loop: "{{ mylist|default([]) }}"
when: item > 5

loop 可以是个字典

1
2
3
- command: echo {{ item.key }}
loop: "{{ query('dict', mydict|default({})) }}"
when: item.value > 5

when 条件还可以在 role incloud import 下使用

1
2
- import_tasks: tasks/sometasks.yml
when: "'reticulating splines' in output"
1
2
3
4
- hosts: webservers
roles:
- role: debian_stock_config
when: ansible_facts['os_family'] == 'Debian'

当我们使用incloud_*的时候,它仅适用于包含任务本身,而不适用于包含文件中的任何其他任务。例子如下

1
2
3
4
5
6
7
8
9
10
11
12
# We wish to include a file to define a variable when it is not
# already defined

# main.yml
- import_tasks: other_tasks.yml # note "import"
when: x is not defined

# other_tasks.yml
- set_fact:
x: foo
- debug:
var: x

上面的配置,等同于

1
2
3
4
5
6
- set_fact:
x: foo
when: x is not defined
- debug:
var: x
when: x is not defined

因此,如果最初未定义x,则将跳过调试任务。通过使用include_tasks而不是import_tasks,other_tasks.yml中的两个任务都将按预期执行。

有些时候我们希望一个playbook可以应用多个操作系统。我们可以这是配置

1
2
3
4
5
6
7
8
9
---
- hosts: all
remote_user: root
vars_files:
- "vars/common.yml"
- [ "vars/{{ ansible_facts['os_family'] }}.yml", "vars/os_defaults.yml" ]
tasks:
- name: make sure apache is started
service: name={{ apache }} state=started
1
2
3
4
---
# for vars/RedHat.yml
apache: httpd
somethingelse: 42

Register Variables 可以和when一起使用

1
2
3
4
5
6
7
8
9
10
- name: test play
hosts: all

tasks:

- shell: cat /etc/motd
register: motd_contents

- shell: echo "motd contains the word hi"
when: motd_contents.stdout.find('hi') != -1
1
2
3
- hosts: webservers
roles:
- { role: debian_stock_config, when: ansible_os_family == 'Debian' }

register 中有个stdout_lines的变量,可以帮你将结果按照split做切割。

1
2
3
4
5
6
7
8
9
10
11
12
13
14
15
- name: registered variable usage as a loop list
hosts: all
tasks:

- name: retrieve the list of home directories
command: ls /home
register: home_dirs

- name: add home dirs to the backup spooler
file:
path: /mnt/bkspool/{{ item }}
src: /home/{{ item }}
state: link
loop: "{{ home_dirs.stdout_lines }}"
# same as loop: "{{ home_dirs.stdout.split() }}"

也可以判断 stdout 是否为空

1
2
3
4
5
6
7
8
9
10
11
12
13
- name: check registered variable for emptiness
hosts: all

tasks:

- name: list contents of directory
command: ls mydir
register: contents

- name: check contents for emptiness
debug:
msg: "Directory is empty"
when: contents.stdout == ""
1
2
3
4
5
6
7
8
- name: test play
hosts: mfs
tasks:
- shell: cat /etc/motd
register: motd_contents

- shell: echo "motd contains the word hi" > /tmp/test2
when: motd_contents.stdout.find('hi') != -1

changed_when

1
2
3
4
5
6
7
8
tasks:
- shell: /usr/bin/billybass --mode="take me to the river"
register: bass_result
changed_when: "bass_result.rc != 2"

# this will never report 'changed' status
- shell: wall 'beep'
changed_when: False

failed_when

1
2
3
4
- name: this command prints FAILED when it fails
command: /usr/bin/example-command -x -y -z
register: command_result
failed_when: "'FAILED' in command_result.stderr"
1
2
3
4
5
6
7
8
  - name: this command prints FAILED when it fails
command: /usr/bin/example-command -x -y -z
register: command_result
ignore_errors: True

- name: fail the play if the previous command did not succeed
fail: msg="the command failed"
when: "'FAILED' in command_result.stderr"

Ad-hoc

Ad-Hoc 是指ansible下临时执行的一条命令,并且不需要保存的命令,对于复杂的命令会使用playbook。Ad-hoc的执行依赖于模块,ansible官方提供了大量的模块。 如:command、raw、shell、file、cron等,具体可以通过ansible-doc -l 进行查看 。可以使用ansible-doc -s module来查看某个模块的参数,也可以使用ansible-doc help module来查看该模块更详细的信息。

ansible 命令帮助

一个ad-hoc命令的执行,需要按以下格式进行执行:

1
ansible 主机或组-m 模块名-a '模块参数'  ansible参数
  • 主机和组,是在/etc/ansible/hosts 里进行指定的部分,当然动态Inventory 使用的是脚本从外部应用里获取的主机。
  • 模块名,可以通过ansible-doc -l 查看目前安装的模块,默认不指定时,使用的是command模块,具体可以查看/etc/ansible/ansible.cfg#module_name = command 部分,默认模块可以在该配置文件中进行修改。
  • 模块参数,可以通过 ansible-doc -s 模块名 查看具体的用法及后面的参数。
  • ansible参数,可以通过ansible命令的帮助信息里查看到,这里有很多参数可以供选择,如是否需要输入密码、是否sudo等。

常用选项

1
Ansible <host-pattern> [options]
  • -i:指定hosts
  • -m: 指定执行的模块。
  • -a: 指定相关的参数。
  • -v,--verbose: 输出更详细的执行过程信息
  • -i PATH,--inventory=PATH: 指定inventory信息
  • -f NUM,--fork NUM:指定线程数。
  • --private-key=PRIVATE_KEY_FILE: 指定秘钥文件。
  • -M DIRECTORY,--module-path=DIRECTORY: 指定模块存放路径。
  • -a ’ARGUMECTORY’,--args=’ARGUMENTS’:模块参数。
  • -k,--ask-pass SSH:认证密码(通常在node机器上没有做过免秘钥的时候用)。
  • -K,--ask-sudo-pass sudo:用户密码(–sudo时用)。
  • -t DIRECTORY,--tree=DIRECTORY:输出信息至DIRECTORY目录下,结果文件以远程主机名命名。
  • -t SECONDS,--timeout=SECONDS: 指定远程主机最大超时,单位是秒。
  • -u USERNAME,--username: 指定远程主机以username运行命令。
  • -l SUBSET,--limit=SUBSET: 指定运行主机。
  • -l ~REGEX: 指定运行主机(正则)。
  • --list-hosts: 列出符合条件的主机列表,不执行任何命令。

ansible和ansible-playbook默认会fork5个线程并发执行命令此时可使用-k num,根据自己主机硬件配置做调整,建议并发数是CPU的偶数倍

例子

1
2
3
ansible -i inventory/devlop linux-node2 -m ping ## 指定devlop组内的linux-node2主机执行ping
ansible -i inventory/devlop "~linux-node[1:3]" -m ping ##匹配正则必须~开头,匹配1和3两台机器
ansible -i inventory/devlop "~linux-node[1-3]" -m ping ## 匹配1,2,3 三台机器

后台执行

当命令执行时间比较长时,也可以放到后台执行,使用-B(后台放置多少秒)、-P(多少秒检查一下状态)参数,如下:

1
2
3
ansible all -B 3600-a "/usr/bin/long_running_operation --do-stuff" #后台执行命令3600s,-B 表示后台执行的时间
ansible all -m async_status -a "jid=123456789" #检查任务的状态
ansible all -B 1800-P 60-a "/usr/bin/long_running_operation --do-stuff" #后台执行命令最大时间是1800s即30分钟,-P 每60s检查下状态,默认15s

命令执行模块

命令执行模块包含如下 四个模块:

  • command模块:该模块通过-a跟要执行的命令可以直接执行,不过命令里如果有带有如下字符部分则执行不成功 “ “<”, “>”, “|”, “&” ;
  • shell 模块:用法基本和command一样,不过其是通过/bin/sh进行执行,所以shell 模块可以执行任何命令,就像在本机执行一样;
  • raw模块:用法和shell 模块一样 ,其也可以执行任意命令,就像在本机执行一样;
  • script模块:其是将管理端的shell 在被管理主机上执行,其原理是先将shell 复制到远程主机,再在远程主机上执行,原理类似于raw模块。

注:raw模块和comand、shell 模块不同的是其没有chdir、creates、removes参数,chdir参数的作用就是先切到chdir指定的目录后,再执行后面的命令,这在后面很多模块里都会有该参数 。
shell 和 command 的区别 :shell 支持管道命令。

command模块包含如下选项:

  • creates:一个文件名,当该文件存在,则该命令不执行 。
  • free_form:要执行的linux指令 。
  • chdir:在执行指令之前,先切换到该指定的目录 。
  • removes:一个文件名,当该文件不存在,则该选项不执行。
  • executable:切换shell来执行指令,该执行路径必须是一个绝对路径。

使用chdir的示例:

1
2
3
ansible 192.168.1.1 -m command -a 'chdir=/tmp/test.txt touch test.file'
ansible 192.168.1.1 -m shell -a 'chdir=/tmp/test.txt touch test2.file'
ansible 192.168.1.1 -m raw -a 'chdir=/tmp/text.txt touch test3.file'

三个命令都会返回执行成功的状态。不过实际上只有前两个文件会被创建成功。使用raw模块的执行的结果文件事实上也被正常创建了,不过不是在chdir指定的目录,而是在当前执行用户的家目录。

creates与removes示例:

1
2
3
ansible 192.168.1.1 -a 'creates=/tmp/server.txt uptime' #当/tmp/server.txt文件存在时,则不执行uptime指令

ansible 192.168.1.1 -a 'removes=/tmp/server.txt uptime' #当/tmp/server.txt文件不存在时,则不执行uptime指令

script模块示例:

要执行的脚本文件script.sh内容如下:

1
2
3
#/bin/bash
ifconfig
df -hT

执行ansible指令:ansible 10.212.52.252 -m script -a 'script.sh' |egrep '>>|stdout'

ansible 内置模块

根据zs官方的分类,将模块按功能分类为:云模块、命令模块、数据库模块、文件模块、资产模块、消息模块、监控模块、网络模块、通知模块、包管理模块、源码控制模块、系统模块、单元模块、web设施模块、windows模块 ,具体可以参看官方页面。

这里从官方分类的模块里选择最常用的一些模块进行介绍。

ping模块

测试主机是否是通的,用法很简单,不涉及参数:

1
ansible test -m ping

setup模块

setup模块,主要用于获取主机信息,在playbooks里经常会用到的一个参数gather_facts就与该模块相关。setup模块下经常使用的一个参数是filter参数,具体使用示例如下:

  • ansible test -m setup: 查看服务器的配置信息
  • ansible test -m setup --tree /tmp/hostlist: 将主机信息保存到/tmp/hostlist目录中。
  • ansible test -m setup -a 'filter=ansible_eth0': 过滤出eth0的网卡信息。
  • ansible test -m setup -a 'filter=ansible_*_mb': 过滤出内存信息。

file模块

file模块主要用于远程主机上的文件操作,file模块包含如下选项:

  • force:需要在两种情况下强制创建软链接,一种是源文件不存在但之后会建立的情况下;另一种是目标软链接已存在,需要先取消之前的软链,然后创建新的软链,有两个选项:yes|no 。
  • group:定义文件/目录的属组 。
  • mode:定义文件/目录的权限。
  • owner:定义文件/目录的属主。
  • path:必选项,定义文件/目录的路径。
  • recurse:递归的设置文件的属性,只对目录有效。
  • src:要被链接的源文件的路径,只应用于state=link的情况。
  • dest:被链接到的路径,只应用于state=link的情况 。
  • state:
    • directory:如果目录不存在,创建目录。
    • file:即使文件不存在,也不会被创建。
    • link:创建软链接。
    • hard:创建硬链接。
    • touch:如果文件不存在,则会创建一个新的文件,如果文件或目录已存在,则更新其最后修改时间。
    • absent:删除目录、文件或者取消链接文件。

使用示例:

  • ansible test -m file -a 'path=/tmp/test state=touch': 创建一个文件。
  • ansible test -m file -a "src=/etc/fstab dest=/tmp/fstab state=link": 创建一个快捷方式。
  • ansible test -m file -a "path=/tmp/fstab state=absent": 删除刚才创建的快捷方式。

copy模块

复制文件到远程主机,copy模块包含如下选项:

  • backup:在覆盖之前将原文件备份,备份文件包含时间信息。有两个选项:yes|no
  • content:用于替代”src”,可以直接设定指定文件的值
  • dest:必选项。要将源文件复制到的远程主机的绝对路径,如果源文件是一个目录,那么该路径也必须是个目录
  • directory_mode:递归的设定目录的权限,默认为系统默认权限
  • force:如果目标主机包含该文件,但内容不同,如果设置为yes,则强制覆盖,如果为no,则只有当目标主机的目标位置不存在该文件时,才复制。默认为yes
  • others:所有的file模块里的选项都可以在这里使用
  • src:要复制到远程主机的文件在本地的地址,可以是绝对路径,也可以是相对路径。如果路径是一个目录,它将递归复制。在这种情况下,如果路径使用”/“来结尾,则只复制目录里的内容,如果没有使用”/“来结尾,则包含目录在内的整个内容全部复制,类似于rsync。

示例如下:

  • ansible -s test -m copy -a "src=/etc/hosts dest=/tmp/hosts owner=root group=root mode=0644": 将本地的hosts拷贝到远程的/tmp目录下。
  • ansible test -m copy -a "src=/etc/hosts dest=/tmp/hosts owner=root group=root mode=0644 backup=yes" 在目标文件存在的情况下,备份目标文件备份文件名:hosts.26172.2018-06-04@14:50:10~
  • ansible test -m copy -a "src=/mine/sudoers dest=/etc/sudoers validate='visudo -cf %s'": ???.

lineinfile模块

如果regexp不匹配文件中的任何一行,则将line所指定的行插入到文件的末尾。

示例如下:

1
2
3
4
- name: Disable UseDNS
lineinfile: dest=/etc/ssh/sshd_config regexp=^UseDNS line="UseDNS no"
notify:
- restart sshd

删除行

将/tmp/test.sh文件中所有匹配^pwd的行删除

1
2
3
4
5
6
7
8
9
10
11
12
13
14
15
16
[root@centos7 templates]# ansible test -m lineinfile -a "path=/tmp/test.sh regexp='^pwd' state=absent"
172.20.21.121 | SUCCESS => {
"backup": "",
"changed": true,
"found": 3,
"msg": "3 line(s) removed"
}

# 再次运行,没有匹配行
[root@centos7 templates]# ansible test -m lineinfile -a "path=/tmp/test.sh regexp='^pwd' state=absent"
172.20.21.121 | SUCCESS => {
"backup": "",
"changed": false,
"found": 0,
"msg": ""
}

替换行并设置文件权限

1
2
3
4
5
6
[root@centos7 ~]# ansible test -m lineinfile -a "path=/etc/hosts regexp='^127.0.0.1' line='127.0.0.1 localhost' owner=root group=root mode=0644"
172.20.21.121 | SUCCESS => {
"backup": "",
"changed": true,
"msg": "line replaced"
}

insertafter和insertbefore

当文件中没有匹配正则表达式^Listen80的行时,会将Listen 80插入到^#Listen所匹配的最后一行的后面。

1
2
3
4
5
6
7
8
9
10
11
12
13
14
[root@centos7 ~]# ansible test -m lineinfile -a "path=/etc/httpd/conf/httpd.conf regexp='^Listen80' insertafter='^#Listen' line='Listen 80'"
172.20.21.121 | SUCCESS => {
"backup": "",
"changed": true,
"msg": "line added"
}

# insertbefore的使用方法类似
[root@centos7 ~]# ansible test -m lineinfile -a "path=/etc/httpd/conf/httpd.conf regexp='^#Listen80' insertbefore='^Listen 80' line='#Listen 80'"
172.20.21.121 | SUCCESS => {
"backup": "",
"changed": true,
"msg": "line added"
}

为文件新增一行

直接在文件中新增一行(如果line不存在则会插入),而不通过正则表达式进行匹配。

1
2
3
4
5
6
7
8
9
10
11
12
13
14
[root@centos7 ~]# ansible test -m lineinfile -a "path=/root/test.sh line='liuhao test'"
172.20.21.121 | SUCCESS => {
"backup": "",
"changed": true,
"msg": "line added"
}

# 再次执行
[root@centos7 ~]# ansible test -m lineinfile -a "path=/root/test.sh line='liuhao test'"
172.20.21.121 | SUCCESS => {
"backup": "",
"changed": false,
"msg": ""
}

backrefs用法

backrefs为no时,如果没有匹配,则添加一行line。如果匹配了,则把匹配内容替被换为line内容。
backrefs为yes时,如果没有匹配,则文件保持不变。如果匹配了,把匹配内容替被换为line内容。

1
2
3
4
5
6
7
8
9
10
11
12
[root@centos7 ~]# ansible test -m lineinfile -a "path=/root/test.sh line='liuhao test1' regexp='^liuhao' backrefs=yes"
172.20.21.121 | SUCCESS => {
"backup": "",
"changed": true,
"msg": "line replaced"
}
[root@centos7 ~]# ansible test -m lineinfile -a "path=/root/test.sh line='liuhao test1' regexp='^liuhao2' backrefs=yes"
172.20.21.121 | SUCCESS => {
"backup": "",
"changed": false,
"msg": ""
}

blockinfile模块

示例如下:

1
2
3
4
5
- name: change system filelimit
blockinfile:
path: /etc/security/limits.conf
block: |
* - nofile 65535

service模块

用于管理服务
该模块包含如下选项:

  • arguments:给命令行提供一些选项
  • enabled:是否开机启动 yes|no
  • name:必选项,服务名称
  • pattern:定义一个模式,如果通过status指令来查看服务的状态时,没有响应,就会通过ps指令在进程中根据该模式进行查找,如果匹配到,则认为该服务依然在运行
  • runlevel:运行级别
  • sleep:如果执行了restarted,在则stop和start之间沉睡几秒钟
  • state:对当前服务执行启动,停止、重启、重新加载等操作(started,stopped,restarted,reloaded)

使用示例:

1
2
3
ansible test -m service -a "name=httpd state=started enabled=yes"
asnible test -m service -a "name=foo pattern=/usr/bin/foo state=started"
ansible test -m service -a "name=network state=restarted args=eth0"

systemd模块

systemd模块用于控制远程主机的systemd服务,说白了,就是Linux下的systemd命令。需要远程主机支持systemd。

用法和service模块基本相同。

模块参数

1
2
3
4
5
6
7
8
9
10
11
12
13
14
15
16
17
18
19
20
21
22
23
24
25
26
27
28
29
30
31
- name: Make sure a service is running
systemd: state=started name=httpd

- name: stop service cron on debian, if running
systemd: name=cron state=stopped

- name: restart service cron on centos, in all cases, also issue daemon-reload to pick up config changes
systemd:
state: restarted
daemon_reload: yes
name: crond

- name: reload service httpd, in all cases
systemd:
name: httpd
state: reloaded

- name: enable service httpd and ensure it is not masked
systemd:
name: httpd
enabled: yes
masked: no

- name: enable a timer for dnf-automatic
systemd:
name: dnf-automatic.timer
state: started
enabled: True

- name: just force systemd to reread configs (2.4 and above)
systemd: daemon_reload=yes

cron模块

用于管理计划任务包含如下选项:

  • backup:对远程主机上的原任务计划内容修改之前做备份。
  • cron_file:如果指定该选项,则用该文件替换远程主机上的cron.d目录下的用户的任务计划。
  • day:日(1-31,/2,……)。
  • hour:小时(0-23,/2,……) 。
  • minute:分钟(0-59,/2,……)。
  • month:月(1-12,/2,……)。
  • weekday:周(0-7,*,……)。
  • job:要执行的任务,依赖于state=present。
  • name:该任务的描述。
  • special_time:指定什么时候执行,参数:reboot,yearly,annually,monthly,weekly,daily,hourly。
  • state:确认该任务计划是创建还是删除。
  • user:以哪个用户的身份执。

示例:

1
2
3
4
ansible test -m cron -a 'name="a job for reboot" special_time=reboot job="/some/job.sh"'
ansible test -m cron -a 'name="yum autoupdate" weekday="2" minute=0 hour=12 user="root"
ansible test -m cron -a 'backup="True" name="test" minute="0" hour="5,2" job="ls -alh > /dev/null"'
ansilbe test -m cron -a 'cron_file=ansible_yum-autoupdate state=absent'
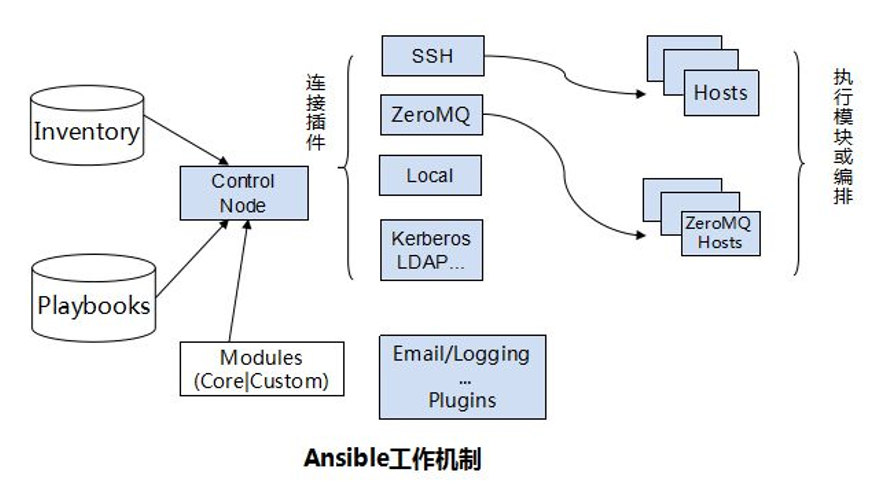
yum模块

使用yum包管理器来管理软件包,其选项有:

  • config_file:yum的配置文件 。
  • disable_gpg_check:关闭gpg_check 。
  • disablerepo:不启用某个源 。
  • enablerepo:启用某个源。
  • name:要进行操作的软件包的名字,也可以传递一个url或者一个本地的rpm包的路径 。
  • state:状态(present(当前版本),absent(删除),latest)。

示例如下:

1
2
3
ansible test -m yum -a 'name=httpd state=latest'
ansible test -m yum -a 'name="@Development tools" state=present'
ansible test -m yum -a 'name=http://nginx.org/packages/centos/6/noarch/RPMS/nginx-release-centos-6-0.el6.ngx.noarch.rpm state=present'

user模块与group模块

user模块是请求的是useradd, userdel, usermod三个指令。
goup模块请求的是groupadd, groupdel, groupmod 三个指令。

user模块

  • home:指定用户的家目录,需要与createhome配合使用.
  • groups:指定用户的属组.
  • uid:指定用的uid.
  • password:指定用户的密码.
  • name:指定用户名.
  • createhome:是否创建家目录 yes|no.
  • system:是否为系统用户.
  • remove:当state=absent时,remove=yes则表示连同家目录一起删除,等价于userdel -r.
  • state:是创建还是删除.
  • shell:指定用户的shell环境.

使用示例:

1
2
3
4
user: name=johnd comment="John Doe" uid=1040 group=admin
user: name=james shell=/bin/bash groups=admins,developers append=yes user: name=johnd state=absent remove=yes
user: name=james18 shell=/bin/zsh groups=developers expires=1422403387
user: name=test generate_ssh_key=yes ssh_key_bits=2048 ssh_key_file=.ssh/id_rsa #生成密钥时,只会生成公钥文件和私钥文件,和直接使用ssh-keygen指令效果相同,不会生成authorized_keys文件。

注:指定password参数时,不能使用明文密码,因为后面这一串密码会被直接传送到被管理主机的/etc/shadow文件中,所以需要先将密码字符串进行加密处理。然后将得到的字符串放到password中即可。

1
2
3
4
shell>  echo "123456" | openssl passwd -1 -salt $(< /dev/urandom tr -dc '[:alnum:]' | head -c 32) -stdin
$1$guC5vhaV$/Ypvq7uxwpwFjoGKLRgZw1
#### 使用上面的密码创建用户
ansible all -m user -a 'name=foo password="$1$4P4PlFuE$ur9ObJiT5iHNrb9QnjaIB0"'

不同的发行版默认使用的加密方式可能会有区别,具体可以查看/etc/login.defs文件确认,centos 6.5版本使用的是SHA512加密算法。

password 密码生成

两种方法设置用户名和密码

第一种 使用ansible自带的函数设置

1
2
3
4
5
6
7
8
---
- hosts: "`hosts`"
gather_facts: false

tasks:
- name: Change password
user: name={{ item }} password={{ user_pass | password_hash('sha512') }}
with_items: users
1
2
### 执行,123456 就是密码
ansible-playbook testuser.yml -e "hosts=jump users=testuser user_pass=*(123456)"

2、第二种 使用python模块先加密完成

1
2
3
4
5
6
7
 2.2 调用crypt 模块

(只用于 Unix)实现了单向的 DES 加密, Unix 系统使用这个加密算法来储存密码。

[root@hrserver1 user]# python -c 'import crypt; print crypt.crypt("hh4213", "hadoop")'
haHAfV7dvUhpM
2.3 得到加密算法密码haHAfV7dvUhpM代入剧本password
1
2
3
4
5
6
7
8
9
---
- hosts: all
user: root
vars:
# created with:
# python -c 'python -c 'import crypt; print crypt.crypt("hh4213", "hadoop")'
password: haHAfV7dvUhpM
tasks:
- user: name=hruser password=`password` update_password=always
1
2
### 执行
ansible-playbook user_pass.yml -v

group模块

1
ansible all -m group -a 'name=somegroup state=present'

synchronize模块

使用 ansible synchronize_module 可以控制机和目标机之间同步目录
使用rsync同步文件,其参数如下:

  • archive: 归档,相当于同时开启recursive(递归)、links、perms、times、owner、group、-D选项都为yes ,默认该项为开启.
  • checksum: 跳过检测sum值,默认关闭.
  • compress:是否开启压缩.
  • copy_links:复制链接文件,默认为no ,注意后面还有一个links参数.
  • delete: 删除不存在的文件,默认no.
  • dest:目录路径.
  • dest_port:默认目录主机上的端口 ,默认是22,走的ssh协议.
  • dirs:传速目录不进行递归,默认为no,即进行目录递归.
  • rsync_opts:rsync参数部分.
  • set_remote_user:主要用于/etc/ansible/hosts中定义或默认使用的用户与rsync使用的用户不同的情况.
  • mode: push或pull 模块,push的话,一般用于从本机向远程主机上传文件,pull 模式用于从远程主机上取文件,默认push模式.

使用示例:

推送 push

1
2
3
ansible test -m synchronize -a 'src=some/relative/path dest=/some/absolute/path rsync_path="sudo rsync" '
ansible test -m synchronize -a 'src=some/relative/path dest=/some/absolute/path archive=no links=yes '
ansible test -m synchronize -a 'src=some/relative/path dest=/some/absolute/path checksum=yes times=no '

拉取 pull

1
ansible test -m synchronize -a 'src=/tmp/helloworld dest=/var/www/helloword rsync_opts=--no-motd,--exclude=.git mode=pull '

synchronize 结合-CD参数

1
2
.d..t...... ./
<f..tpog... jr-sta.conf
  • t: 表示修改了时间。
  • p: 表示修改了权限。
  • o: 表示修改了user。
  • g: 表示修改了group。
  • s: 表示修改了大小。

Explanation of each bit position and value in rsync’s output:

1
2
3
4
5
6
7
8
9
10
11
12
13
14
15
16
17
18
19
20
21
22
23
24
25
26
27
28
29
30
31
YXcstpoguax  path/to/file
|||||||||||
||||||||||╰- x: The extended attribute information changed
|||||||||╰-- a: The ACL information changed
||||||||╰--- u: The u slot is reserved for future use
|||||||╰---- g: Group is different
||||||╰----- o: Owner is different
|||||╰------ p: Permission are different
||||╰------- t: Modification time is different
|||╰-------- s: Size is different
||╰--------- c: Different checksum (for regular files), or
|| changed value (for symlinks, devices, and special files)
|╰---------- the file type:
| f: for a file,
| d: for a directory,
| L: for a symlink,
| D: for a device,
| S: for a special file (e.g. named sockets and fifos)
╰----------- the type of update being done::
<: file is being transferred to the remote host (sent)
>: file is being transferred to the local host (received)
c: local change/creation for the item, such as:
- the creation of a directory
- the changing of a symlink,
- etc.
h: the item is a hard link to another item (requires
--hard-links).
.: the item is not being updated (though it might have
attributes that are being modified)
*: means that the rest of the itemized-output area contains
a message (e.g. "deleting")

filesystem模块

在块设备上创建文件系统

  • dev:目标块设备.
  • force:在一个已有文件系统 的设备上强制创建.
  • fstype:文件系统的类型.
  • opts:传递给mkfs命令的选项.

示例:

1
2
3
ansible test -m filesystem -a 'fstype=ext2 dev=/dev/sdb1 force=yes'

ansible test -m filesystem -a 'fstype=ext4 dev=/dev/sdb1 opts="-cc"'

mount模块

配置挂载点

  • fstype:必选项,挂载文件的类型.
  • name:必选项,挂载点.
  • opts:传递给mount命令的参数.
  • src:必选项,要挂载的文件.
  • state:必选项.
    • present:只在fstab中写入配置。
    • absent:删除挂载点。
    • mounted:自动创建挂载点并挂载, 同时写入fstab。
    • umounted:卸载。

示例:

1
2
3
name=/mnt/dvd src=/dev/sr0 fstype=iso9660 opts=ro state=present
name=/srv/disk src='LABEL=SOME_LABEL' state=present
name=/home src='UUID=b3e48f45-f933-4c8e-a700-22a159ec9077' opts=noatime state=present

ansible 创建一个硬盘并挂载

1
2
3
4
ansible test -a 'dd if=/dev/zero of=/disk.img bs=4k count=1024'
ansible test -a 'losetup /dev/loop0 /disk.img'
ansible test -m filesystem 'fstype=ext4 force=yes opts=-F dev=/dev/loop0'
ansible test -m mount 'name=/mnt src=/dev/loop0 fstype=ext4 state=mounted opts=rw'

get_url 模块

该模块主要用于从http、ftp、https服务器上下载文件(类似于wget),主要有如下选项:

  • sha256sum:下载完成后进行sha256 check.
  • timeout:下载超时时间,默认10s.
  • url:下载的URL.
  • url_password、url_username:主要用于需要用户名密码进行验证的情况.
  • use_proxy:是事使用代理,代理需事先在环境变更中定义.

示例:

1
2
get_url: url=http://example.com/path/file.conf dest=/etc/foo.conf mode=0440
get_url: url=http://example.com/path/file.conf dest=/etc/foo.conf sha256sum=b5bb9d8014a0f9b1d61e21e796d78dccdf1352f23cd32812f4850b878ae4944c

unarchive模块

用于解压文件,模块包含如下选项:

  • copy:在解压文件之前,是否先将文件复制到远程主机,默认为yes。若为no,则要求目标主机上压缩包必须存在。
  • creates:指定一个文件名,当该文件存在时,则解压指令不执行。
  • dest:远程主机上的一个路径,即文件解压的路径 。
  • grop:解压后的目录或文件的属组。
  • list_files:如果为yes,则会列出压缩包里的文件,默认为no,2.0版本新增的选项。
  • mode:解决后文件的权限。
  • src:如果copy为yes,则需要指定压缩文件的源路径 。
  • owner:解压后文件或目录的属主。

示例如下:

1
2
3
- unarchive: src=foo.tgz dest=/var/lib/foo
- unarchive: src=/tmp/foo.zip dest=/usr/local/bin copy=no
- unarchive: src=https://example.com/example.zip dest=/usr/local/bin copy=no

sysctl模块

示例如下:

1
2
3
4
- name: set sysctl
sysctl: name={{ item.name }} value={{ item.value }} state=present
with_items:
- { name: vm.max_map_count, value: 262144 }

authorized_key 模块

用于向远程主机的某个账户的authorized_keys文件中增加公钥 或 从中移除公钥。

  • exclusive: 是否从authorized_keys文件中移除所有其他的未指定的公钥。当想要指定多个公钥的时候,可以将key参数指定为 新行 分隔的公钥列表。需要注意的是,当使用with_*的时候,每次迭代都会进行移除操作。(Choices: yes, no)[Default: no]

  • key: ssh公钥。可以是一个字符串,也可以是一个url。

  • manage_dir: 是否管理authorized_keys文件所在的目录。如果设置了这个选项,那么authorized_key模块,会创建这个目录,并且会设置目录的所有者和权限。(Choices: yes, no)[Default: yes]

  • path: 给authorized_keys文件设置一个替代的路径。[Default: (homedir)+/.ssh/authorized_keys]

  • state: present表示添加公钥,absent表示删除公钥。

  • user: 远程主机上的用户名。

  • validate_certs: 只有key的值是https url的时候,才起作用。如果设置该选项为no,那么不会校验SSL证书。(Choices: yes, no)[Default: yes]

例子

使用管理机上的本地文件的例子:

1
- authorized_key: user=charlie key="{{ lookup('file', '/home/charlie/.ssh/id_rsa.pub') }}"

使用github url作为key的来源

1
- authorized_key: user=charlie key=https://github.com/charlie.keys

给authorized_keys文件指定一个替代的路径

1
2
3
4
5
- authorized_key:
user: charlie
key: "{{ lookup('file', '/home/charlie/.ssh/id_rsa.pub') }}"
path: '/etc/ssh/authorized_keys/charlie'
manage_dir: no

使用with_file循环

1
2
3
4
5
- name: Set up authorized_keys for the deploy user
authorized_key: user=deploy key="{{ item }}"
with_file:
- public_keys/doe-jane
- public_keys/doe-john

使用ssh key选项

1
2
3
4
- authorized_key:
user: charlie
key: "{{ lookup('file', '/home/charlie/.ssh/id_rsa.pub') }}"
key_options: 'no-port-forwarding,from="10.0.1.1"'

使用validate_certs

1
- authorized_key: user=charlie key=https://github.com/user.keys validate_certs=no

向远程主机的root用户的authorized_keys文件中,增加本地的public_keys/doe-jane文件中列出的公钥列表,并删除不在这个列表中的公钥

1
2
3
- authorized_key: user=root key="{{ item }}" state=present exclusive=yes
with_file:
- public_keys/doe-jane

将正在运行ansible的用户的主目录下的.ssh/id_rsa.pub文件里的公钥拷贝到远程主机的ubuntu用户的authorized_keys文件中

1
2
- authorized_key: user=ubuntu key="{{ lookup('file', lookup('env','HOME') + '/.ssh/id_rsa.pub') }}"
become: yes

参考文档

ansible synchronize 同步文件夹

ansible 读取文件的顺序

  1. export ANSIBLE_CONFIG:首先,Ansible命令会检查环境变量,及这个环境变量将指向的配置文件 。
  2. ./ansible.cfg:其次,将会检查当前目录下的ansible.cfg配置文件。
  3. ~/.ansible.cfg:再次,将会检查当前用户home目录下的.ansible.cfg配置文件。
  4. /etc/ansible/ansible.cfg:最后,将会检查在用软件包管理工具安装Ansible时自动产生的配置文件。

Ansible默认安装好后有一个配置文件/etc/ansible/ansible.cfg,该配置文件中定义了ansible的主机的默认配置部分,如默认是否需要输入密码、是否开启sudo认证、action_plugins插件的位置、hosts主机组的位置、是否开启log功能、默认端口、key文件位置等等。

具体如下:

1
2
3
4
5
6
7
8
9
10
11
12
13
14
15
16
17
18
19
20
21
22
23
24
25
26
27
28
29
30
31
32
33
[defaults]
# some basic default values...
hostfile = /etc/ansible/hosts \\指定默认hosts配置的位置
# library_path = /usr/share/my_modules/
remote_tmp = $HOME/.ansible/tmp
pattern = *
forks = 5
poll_interval = 15
sudo_user = root \\远程sudo用户
#ask_sudo_pass = True \\每次执行ansible命令是否询问ssh密码
#ask_pass = True \\每次执行ansible命令时是否询问sudo密码
transport = smart
remote_port = 22
module_lang = C
gathering = implicit
host_key_checking = False \\关闭第一次使用ansible连接客户端是输入命令提示
log_path = /var/log/ansible.log \\需要时可以自行添加。chown -R root:root ansible.log
system_warnings = False \\关闭运行ansible时系统的提示信息,一般为提示升级
# set plugin path directories here, separate with colons
action_plugins = /usr/share/ansible_plugins/action_plugins
callback_plugins = /usr/share/ansible_plugins/callback_plugins
connection_plugins = /usr/share/ansible_plugins/connection_plugins
lookup_plugins = /usr/share/ansible_plugins/lookup_plugins
vars_plugins = /usr/share/ansible_plugins/vars_plugins
filter_plugins = /usr/share/ansible_plugins/filter_plugins
fact_caching = memory
[accelerate]
accelerate_port = 5099
accelerate_timeout = 30
accelerate_connect_timeout = 5.0
# The daemon timeout is measured in minutes. This time is measured
# from the last activity to the accelerate daemon.
accelerate_daemon_timeout = 30

其他参数

默认ansible 执行的时候,并不会输出日志到文件,不过在ansible.cfg 配置文件中有如下行:

log_path = /var/log/ansible.log
默认log_path这行是注释的,打开该行的注释,所有的命令执行后,都会将日志输出到/var/log/ansible.log文件。

DEFAULT_ROLES_PATH

roles 查找路径
Description: Colon separated paths in which Ansible will search for Roles.
Type: pathspec
Default: ~/.ansible/roles:/usr/share/ansible/roles:/etc/ansible/roles
Ini Section: defaults
Ini Key: roles_path
Environment: ANSIBLE_ROLES_PATH

我们可以在自己的仓库中自定义
DEFAULT_ROLES_PATH: roles:roles/www/

报错汇总

如果在对之前未连接的主机进行连结时报错

1
2
ansible test -a 'uptime'
192.168.56.12| FAILED =>Using a SSH password instead of a key is not possible because HostKey checking is enabled and sshpass does not support this.Please add this host's fingerprint to your known_hosts file to manage this host.

是由于在本机的~/.ssh/known_hosts文件中并有fingerprint key串,ssh第一次连接的时候一般会提示输入yes 进行确认为将key字符串加入到~/.ssh/known_hosts 文件中。

解决办法:
方法一:
在进行ssh连接时,可以使用-o参数将StrictHostKeyChecking设置为no,使用ssh连接时避免首次连接时让输入yes/no部分的提示。通过查看ansible.cfg配置文件,发现如下行:

1
2
3
4
5
6
7
8
[ssh_connection]
# ssh arguments to use
# Leaving off ControlPersist will result in poor performance, so use
# paramiko on older platforms rather than removing it
#ssh_args = -o ControlMaster=auto -o ControlPersist=60s
可以启用ssh_args 部分,使用下面的配置,避免上面出现的错误:

ssh_args = -o ControlMaster=auto -o ControlPersist=60s -o StrictHostKeyChecking=no

方法2:
在ansible.cfg配置文件中,也会找到如下配置:

1
2
# uncomment this to disable SSH key host checking
host_key_checking = False

默认host_key_checking部分是注释的,通过找开该行的注释,同样也可以实现跳过ssh 首次连接提示验证部分。但在实际测试中,似乎并没有效果,建议使用方法1.

参考文档

ansible config

playbook是由一个或多个“play”组成的列表。play的主要功能在于将事先归并为一组的主机装扮成事先通过ansible中的task定义好的角色。从根本上来讲,所谓task无非是调用ansible的一个module。将多个play组织在一个playbook中,即可以让它们联合起来按事先编排的机制完成某一任务。

playbook 分为四大任务块:

  • Target section: 定义将要执行playbook的远程主机组。
  • Variable section: 定义playbook运行时需要使用的变量。
  • Task section: 定义将要在远程主机上执行的任务列表。
  • Handler section: 定义task执行完成以后需要调用的任务。

一个完整的例子:

1
2
3
4
5
6
7
8
9
10
11
- hosts: mfs_node
user: root
vars:
- motd_warning: 'WARNING: Use by ACME Employees ONLY'
tasks:
- name: setup a MOTD
copy: dest=/etc/motd content="{{ motd_warning }}"
notify: say someting
handlers:
- name: say someting
command: echo "copy OK"

命令行执行

1
2
3
ansible-playbook -i inventory/devlop site.yaml
ansible-playbook -i inventory/devlop site.yaml -l linux-node2
ansible-playbook -i inventory/devlop -e target=gsg_tmp -e role=php56 role.yml

ansible-playbook 常用参数

  • -C :只显示哪些有变更,但是不执行任何参数。
  • -D: 通常和-C参数一起使用,显示变化的内容。
  • -t:匹配tags。
  • -e: 增加扩展的参数。
  • -v: 显示详细内容。
  • -vvv: 显示更详细的内容。

Target section

  • hosts:定义远程的主机组。
  • user:执行该任务组的用户。
  • remote_user:与user相同。
  • sudo:如果设置为yes,执行该任务组的用户在执行任务的时候,获取root权限。
  • sudo_user:如果你设置user为tom,sudo为yes,sudo_user为jerry,则tom用户则会获取jerry用户的权限。
  • connection:通过什么方式连接到远程主机,默认为ssh。
  • gather_facts:除非你明确说明不需要在远程主机上执行setup模块,否则默认会自动执行。如果你确实不需要setup模块所传递过来的变量,你可以启用该选项。

Variable section

vars
vars_files
vars_prompt
setup

Task section

task任务的编写方法

1
2
3
4
5
6
7
8
9
10
11
tasks:
- name: install apache
action: yum name=httpd state=installed #第一种方法

- name: configure apache
copy: src=files/httpd.conf dest=/etc/httpd/conf/httpd.conf #第二种方法

- name: restart apache
service:
name: httpd
state: restarted #第三种方法

task任务中的常用模块

template

template模块是Ansible中最常用的模块之一。它可以让你设计一个框架式的配置文件,如何把Anisble需要的值插入到合适的位置。其中Jinja2模板尤为复杂,其中可以包含条件、循环、宏。

1
2
3
tasks:
- name: copy config file to remote server
template: src=named.conf.j2 dest=/etc/named.conf

named.conf.j2 模板的内容

1
2
3
4
5
6
7
8
9
10
11
12
13
14
15
16
17
18
19
20
21
22
23
24
25
26
27
28
29
30
31
32
33
34
35
36
37
38
39
# {{ ansible_managed }}
options {
listen-on port 53 {
127.0.0.1;
{% for ip in ansible_all_ipv4_addresses %}
{{ ip }};
{% endfor %}
};
listen-on-v6 port 53 { ::1; };
directory "/var/named";
dump-file "/var/named/data/cache_dump.db";
statistics-file "/var/named/data/named_stats.txt";
memstatistics-file "/var/named/data/named_mem_stats.txt";
};
zone "." IN {
type hint;
file "named.ca";
};
include "/etc/named.rfc1912.zones";
include "/etc/named.root.key";
{# Variables for zone config #}

{% if 'authorativenames' in group_names %}
{% set zone_type = 'master' %}
{% set zone_dir = 'data' %}

{% else %}
{% set zone_type = 'slave' %}
{% set zone_dir = 'slaves' %}
{% endif %}

zone "internal.example.com" IN {
type {{ zone_type }};
file "{{ zone_dir }}/internal.example.com";

{% if 'authorativenames' not in group_names %}
masters { 192.168.2.2; };
{% endif %}
};

set_fact

set_fact模块可以让你在远程受管机器上执行脚本的过程中来计算我们需要的值,这些值可以被用在模板或者变量中。这些值有点类似setup模块中的参数,只不过setup模块是以单台主机为单位的。

1
2
3
4
5
6
7
8
9
10
11
12
13
14
15
- hosts: mysqlservers
tasks:
- name: install MySql
yum: name=mysql-server state=installed
- name: Calculate InnoDB buffer pool size
set_fact: innodb_buffer_pool_size_mb="{{ ansible_memtotal_mb /2 }}"
- name: Configure MySQL
template: src=templates/my.cnf.j2 dest=/etc/my.cnf owner=root group=root mode=0644
notify: restart mysql
- name: Start MySQL
service: name=mysqld state=started enabled=yes

handlers:
- name: restart mysql
service: name=mysqld state=restarted
1
2
3
4
5
6
7
8
9
[mysqld]
datadir=/var/lib/mysql
socket=/var/lib/mysql/mysql.sock
symbolic-links=0
innodb_buffer_pool_size = {{ innodb_buffer_pool_size_mb|default(128) }}M

[mysqld_safe]
log-error=/var/log/mysqld.log
pid-file=/var/run/mysqld/mysqld.pid

补充一个官方的例子

1
2
3
4
5
6
7
8
9
10
11
12
13
14
# Example setting host facts using key=value pairs
- set_fact: one_fact="something" other_fact="{{ local_var * 2 }}"

# Example setting host facts using complex arguments
- set_fact:
one_fact: something
other_fact: "{{ local_var * 2 }}"

# As of 1.8, Ansible will convert boolean strings ('true', 'false', 'yes', 'no')
# to proper boolean values when using the key=value syntax, however it is still
# recommended that booleans be set using the complex argument style:
- set_fact:
one_fact: true
other_fact: false

pause

暂停模块可以让我们在playbook中暂停一段时间,可以指定一个时间段,或者提示用户继续。在命令行模式中,这没什么用,但是在playbook中,这很有用处。
暂停模块通常被用在当我们需要用户来提供一个确认来继续的时候,或者在一个特殊的时间点手动确认。比如你更新一个web应用程序之后,你需要用户在接受用户的连接之前,手工确认一切Ok。这也可以用来提示用户一些可能出现的问题,并提供选项继续。Ansible会打印出服务器的名字,要求用户确认之后继续。如果在目标选项中设置了串行参数,Ansible会询问组里面的每一个主机。这种方式可以让用户在部署的时候,灵活的控制整个节奏,并监控整个交互过程。

1
2
3
4
5
- name: wait on user input
pause: prompt="Warning! Detected slight issue. ENTER to continue CTRL-C to quit."

- name: timed wait
pause: seconds=30

wait_for

wait_for模块用来检测一个tcp端口是否准备好接收远程连接,这是由远程主机来完成的。如果你只指定了端口,或者主机参数被设置为localhost,它会尝试连接远程受管主机。你可以用local_action参数来指定从控制机器来运行命令,并使用ansible_hostname做为主机参数来连接远程受管主机。这个模块在后台运行某些程序,或者启动某些进程需要一些时间的时候特别有用。

1
2
3
4
5
6
7
8
9
10
- hosts: webapps
tasks:
- name: Install Tomcat
yum: name=tomcat6 state=installed

- name: Start Tomcat
service: name=tomcat6 state=started

- name: Wait for Tomcat to start
wait_for: port=8080 state=started

assemble

assemble组装模块把多个受管主机的文件合并成一个文件,当配置文件不允许包含的时候,这非常有用,特别是在设置root用户的authorized_keys文件的时候。

1
2
3
4
5
6
7
8
9
10
11
12
13
14
15
- hosts: all

tasks:
- name: Make a Directory in /opt
file: path=/opt/sshkeys state=directory owner=root group=root mode=0700
- name: Copy SSH keys over
copy: src=keys/{{ item }}.pub dest=/opt/sshkeys/{{ item }}.pub owner=root group=root mode=0600
with_items:
- dan
- kate
- mal
- name: Make the root users SSH config directory
file: path=/root/.ssh state=directory owner=root group=root mode=0700
- name: Build the authorized_keys file
assemble: src=/opt/sshkeys dest=/root/.ssh/authorized_keys

add_host

add_host 添加主机模块是playbook中一个强大的模块,它可以让你动态的添加受管主机到一个play中。我们可以使用uri模块从CMDB中获得主机信息然后添加他们。它还可以将主机加到组里面,如果组不存在的话还会自动创建它。这个模块仅需要主机名和组名2个参数,跟主机库存清单的配置一样,我们还可以添加扩展的参数像ansible_ssh_user , ansible_ssh_port等等。

group_by

group_by 模块可以让我们根据主机的真实特性来进行分组,真实特性可以通过add_fact来实现(前面已经介绍过set_fact)。group_by模块只接受一个参数,key,同样组名的机器就被分到一个组里面。如果我们在这里使用变量,我们就可以把同一个操作系统类型、同一个拓扑结构的、或者其他我们希望的拥有同样特性的主机分成一组,组可以在子play中、模板中的目标选项被使用。

1
2
3
4
5
6
7
8
9
10
11
12
13
14
15
16
17
18
19
- name: Create operating system group
hosts: all

tasks:
- group_by: key=os_{{ ansible_distribution }}

- name: Run on CentOS hosts only
hosts: os_CentOS

tasks:
- name: Install Apache
yum: name=httpd state=latest

- name: Run on Ubuntu hosts only
hosts: os_Ubuntu

tasks:
- name: Install Apache
apt: pkg=apache2 state=latest

get_url

将文件从HTTP,HTTPS或FTP下载到远程服务器。远程服务器必须能够直接访问远程资源。默认情况下,如果在目标主机上设置了环境变量 _proxy,那么请求将通过该代理发送。

1
2
3
4
5
- name: download foo.conf
get_url: url=http://example.com/path/file.conf dest=/etc/foo.conf mode=0440

- name: download file with sha256 check
get_url: url=http://example.com/path/file.conf dest=/etc/foo.conf sha256sum=b5bb9d8014a0f9b1d61e21e796d78dccdf1352f23cd32812f4850b878ae4944c

debug

该模块在执行期间打印语句,可用于调试变量或表达式,而无需停止操作手册。用于与’when:’指令一起调试。

1
2
3
4
5
6
7
8
9
10
# Example that prints the loopback address and gateway for each host
- debug: msg="System {{ inventory_hostname }} has uuid {{ ansible_product_uuid }}"

- debug: msg="System {{ inventory_hostname }} has gateway {{ ansible_default_ipv4.gateway }}"
when: ansible_default_ipv4.gateway is defined

- name: Display all variables/facts known for a host
debug: var=hostvars[inventory_hostname]

debug: msg="The varibale is {{ info['stdout'] }}"

查看shell的输出

1
2
3
4
5
- name: check oenresty
shell: openresty -t
register: message
- debug: var=message.stdout_lines
- debug: var=message.stderr_lines

fail

该模块无法通过自定义消息取得进展。当使用何时满足某个条件时,它可以用于救援。

1
2
3
# Example playbook using fail and when together
- fail: msg="The system may not be provisioned according to the CMDB status."
when: cmdb_status != "to-be-staged"

Handler section

Handler 模块提供回调功能,在所有tasks任务执行完成后,才会执行Handler模块。

1
2
3
4
5
6
7
8
9
10
11
12
tasks:
- name: template configuration file
template: src=template.j2 dest=/etc/foo.conf
notify:
- restart memcached
- restart apache

handlers:
- name: restart memcached
service: name= memcached state=restarted
- name: restart apache
service: name=httpd state=restarted
1
2
3
4
5
6
7
8
9
10
11
12
13
14
15
16
- hosts: all
user: root

tasks:
- name: install memcached
yum: name=memcached state=installed
- name: set memcached size
set_fact: memcached_size="{{ ansible_memtotal_mb /4 }}"
- name: copy configurations
template: src=templates/memcached.j2 dest=/etc/sysconfig/memcached
notify:
- restart memcached

handlers:
- name: restart memcached
service: name=memcached state=restarted enabled=yes

·Handlers只会在Play的末尾运行一次;如果想在一个Playbook的中间运行Handlers,则需要使用meta模块来实现,例如:-meta:flush_handlers。

·如果一个Play在运行到调用Handlers的语句之前失败了,那么这个Handlers将不会被执行。我们可以使用mega模块的–force-handlers选项来强制执行Handlers,即使是Handlers所在的Play中途运行失败也能执行。

serial 参数的作用

你可以定义Ansible可以在一个特定时间同时控制多少主机,使用serial 关键词:

1
2
3
- name: test play
hosts: webservers
serial: 3

在上面的例子,如果我们有100台主机,3 台主机定义在组’webservers’ 可以在下面3个主机开始之前完全完成。

这个serial关键词在Ansible 1.8 以后可以被定义为百分数,用来定义每一次操作一个play中百分之多少主机:

1
2
3
- name: test play
hosts: websevers
serial: "30%"

如果主机数不能被passes数量整除,最后的pass将会包含提醒信息。

ansible disable swap

https://germaniumhq.com/2019/02/14/2019-02-14-Disabling-Swap-for-Kubernetes-in-an-Ansible-Playbook/

参考文档

ansible-examples
ansible学习之四:Playbooks
galaxy ansible 分享role配置文件的路径
ansible-playbook command tools

主机目录配置文件

  • 默认文件 : /etc/ansible/hosts

修改主机目录的配置文件: /etc/ansible/ansible.cfg, 指定inventory的路径

1
inventory      = /data/db/playbook/inventory
  • 命令行中传递主机目录配置文件。ansible-playbook -i inventory site.ymlansible-playbook --inventory-file inventory site.yml

如何编写 Hosts and Groups(主机与组)

简单的主机和组

1
2
3
4
5
6
7
8
9
10
mail.example.com

[webservers]
foo.example.com
bar.example.com

[dbservers]
one.example.com
two.example.com
three.example.com
  • 中括号中的名字代表组名,可以根据自己的需求将庞大的主机分成具有标识的组,如上面分了两个组webservers和dbservers组。
  • 主机(hosts)部分可以使用域名、主机名、IP地址表示;当然使用前两者时,也需要主机能反解析到相应的IP地址,一般此类配置中多使用IP地址。

单独配置端口与别名

如果某些主机的SSH运行在自定义的端口上,ansible使用Paramiko进行ssh连接时,不会使用你SSH配置文件中列出的端口,但是如果修改ansible使用openssh进行ssh连接时将会使用:

1
2
[webservers]
192.168.56.13:52113

假如你想要为某些静态IP设置一些别名,可以这样做:

1
test1 ansible_ssh_port = 52113 ansible_ssh_host = 192.168.56.13

上面的 test1别名就指代了IP为192.168.56.13,ssh连接端口为52113的主机。

使用正则指定主机范围

1
2
3
4
5
[webservers]
www[01:50].example.com

[databases]
db-[a:f].example.com

上面指定了从web1到web50,webservers组共计50台主机;databases组有db-a到db-f共6台主机。

使用主机变量

以下是Hosts部分中经常用到的变量部分:

  • ansible_ssh_host: #用于指定被管理的主机的真实IP。
  • ansible_ssh_port: #用于指定连接到被管理主机的ssh端口号,默认是22。
  • ansible_ssh_user: #ssh连接时默认使用的用户名。
  • ansible_ssh_pass: #ssh连接时的密码。
  • ansible_sudo_pass: #使用sudo连接用户时的密码。
  • ansible_sudo_exec: #如果sudo命令不在默认路径,需要指定sudo命令路径。
  • ansible_ssh_private_key_file: #秘钥文件路径,秘钥文件如果不想使用ssh-agent管理时可以使用此选项。
  • ansible_shell_type: #目标系统的shell的类型,默认sh。
  • ansible_connection: #SSH 连接的类型: local , ssh , paramiko,在 ansible 1.2 之前默认是 paramiko ,后来智能选择,优先使用基于 ControlPersist 的 ssh (支持的前提)。
  • ansible_python_interpreter: #用来指定python解释器的路径,默认为/usr/bin/python 同样可以指定ruby 、perl 的路径。
  • ansible_*_interpreter: #其他解释器路径,用法与ansible_python_interpreter类似,这里”*”可以是ruby或才perl等其他语言。

示例如下:

1
2
3
4
[test]
192.168.1.1 ansible_ssh_user=root ansible_ssh_pass='abcdefg'
192.168.1.2 ansible_ssh_user=breeze ansible_ssh_pass='123456'
192.168.1.3 ansible_ssh_user=bernie ansible_ssh_port=3055 ansible_ssh_pass='456789'

上面的示例中指定了三台主机,三台主机的用密码分别是abcdefg、123456、45789,指定的ssh连接的用户名分别为root、breeze、bernie,ssh 端口分别为22、22、3055 ,这样在ansible命令执行的时候就不用再指令用户和密码等了。

组内变量

变量也可以通过组名,应用到组内的所有成员:

1
2
3
4
5
6
7
[webserver]
host1
host2

[webserver:vars]
ntp_server=ntp.atlanta.example.com
proxy=proxy.atlanta.example.com

上面test组中包含两台主机,通过对test组指定vars变更,相应的host1和host2相当于相应的指定了ntp_server和proxy变量参数值 。

按目录结构存储变量

假设inventory文件为/etc/ansible/hosts,那么相关的hosts和group变量可以放在下面的目录结构下

1
2
3
/etc/ansible/group_vars/webserver # can optionally end in '.yml', '.yaml', or '.json'
/etc/ansible/group_vars/webservers
/etc/ansible/host_vars/foosball

/etc/ansible/group_vars/webserver文件内容可以为

1
2
3
---
ntp_server: acme.example.org
database_server: storage.example.org

如果对应的名字为目录名,ansible会读取这个目录下面所有文件的内容

1
2
/etc/ansible/group_vars/raleigh/db_settings
/etc/ansible/group_vars/raleigh/cluster_settings

group_vars/ 和 host_vars/ 目录可放在 inventory 目录下,或是 playbook 目录下. 如果两个目录下都存在,那么 playbook 目录下的配置会覆盖 inventory 目录的配置.

组的包含与组内变量

1
2
3
4
5
6
7
8
9
10
11
12
13
14
15
16
17
18
19
20
21
22
23
[atlanta]
host1
host2

[raleigh]
host2
host3

[southeast:children]
atlanta
raleigh

[southeast:vars]
some_server=foo.southeast.example.com
halon_system_timeout=30
self_destruct_countdown=60
escape_pods=2

[usa:children]
southeast
northeast
southwest
northwest
  • 任何属于子组的成员都自动成为父组的成员。
  • 子组的变量将具有更高的优先级(覆盖)父组的变量。
  • 组可以有多个父母和孩子,但不是循环关系。
  • 主机也可以在多个组中,但只有一个主机实例,合并来自多个组的数据。

注:vars变量在ansible ad-hoc部分中基本用不到,主要用在ansible-playbook中。

Patterns(主机与组正则匹配部分)

把Patterns 直接理解为正则实际是不完全准确的,正常的理解为patterns意味着在ansible中管理哪些主机,也可以理解为,要与哪台主机进行通信。在探讨这个问题之前我们先看下ansible的用法:

1
ansible <pattern_goes_here> -m <module_name> -a <arguments>

直接上一个示例:

1
ansible webservers -m service -a "name=httpd state=restarted"

这里是对webservers 组或主机重启httpd服务 ,其中webservers 就是Pattern部分。而之所以上面说Pattern(模式)可以理解为正则,主要针对下面经常用到的用法而言的。

  1. 表示所有的主机可以使用all 或 *
  2. 通配符与逻辑或
  3. 利用通配符还可以指定一组具有规则特征的主机或主机名,冒号表示or---逻辑或
1
2
3
4
web1.biglittleant.com
web1.biglittleant.com:web2.biglittleant.com
192.168.1.1
192.168.1.*

当然,这里的*通配符也可以用在前面,如:

1
2
3
4
*.biglittleant.com
*.com
webservers1[0] #表示匹配 webservers1 组的第 1 个主机
webservers1[0:25] #表示匹配 webservers1 组的第 1 个到第 25 个主机(官网文档是":"表示范围,测试发现应该使用"-",注意不要和匹配多个主机组混淆)

上面的用法,在多个组之间同样适用 ,如:

1
2
webservers
webservers:dbservers #表示两个组中所有的主机

逻辑非与逻辑and

非的表达式,如,目标主机必须在组webservers但不在phoenix组中

1
webserver:!phoenix

交集的表达式,如,目标主机必须即在组webservers中又在组staging中

1
webservers:&staging

一个更复杂的示例:

1
webserver:dbservers:&staging:!phoenix

上面这个复杂的表达式最后表示的目标主机必须满足:在webservers或者dbservers组中,必须还存在于staging组中,但是不在phoenix组中 。

混合高级用法

1
*.yanruogu.com:*.org

还可以在开头的地方使用”~”,用来表示这是一个正则表达式:

1
~(web|db).*\.yanruogu\.com

给两个ansible-playbook中具体可能用的用法:

  1. 在ansible-palybook命令中,你也可以使用变量来组成这样的表达式,但是你必须使用“-e”的选项来指定这个表达式(通常我们不这样用):
1
ansible-palybook -e webservers:!`excluded`:&`required`
  1. 在ansible和ansible-playbook中,还可以通过一个参数”–limit”来明确指定排除某些主机或组:
1
ansible-playbook site.yml --limit datacenter2
  1. 从Ansible1.2开始,如果想排除一个文件中的主机可以使用”@”:
1
ansible-playbook site.yml --limit @retry_hosts.txt

动态 定义主机组

踩坑

1
ansible -i inventory/ other -m ping

当执行如上命令时,other 如果有多个组,他会将所有的other组都执行。而不是报错。

参考文档

Working with Inventory

ansible 简介

ansible整体软件架构图

Ansible 在管理节点将 Ansible 模块通过 SSH 协议(或者 Kerberos、LDAP)推送到被管理端执行,执行完之后自动删除,可以使用 SVN 等来管理自定义模块及编排

ansible-整体架构图

  1. 管理端支持local 、ssh、zeromq 三种方式连接被管理端,默认使用基于ssh的连接。
  2. 可以按应用类型等方式进行Host Inventory(主机群)分类,管理节点通过各类模块实现相应的操作。单个模块,单条命令的批量执行,我们可以称之为ad-hoc;
  3. 管理节点可以通过playbooks 实现多个task的集合实现一类功能,如web服务的安装部署、数据库服务器的批量备份等。playbooks我们可以简单的理解为,系统通过组合多条ad-hoc操作的配置文件。

ansible 软件基本架构

ansible-软件架构图

远程调用管理模块,从Inventory里调用主机名字, ssh远端服务器执行命令,执行完成返回结果。

ansible特性

  1. 基于python语言实现, 模块化设计 ,调用特定的模块来完成特定任务 ,本身是核心组件,短小精悍 。

  2. 由Paramiko来实现创建ssh连接,基于ssh协议连接每一个被管理主机。

  3. YAML格式是基于PyYAML模块来实现功能的,因为这个模块还支持模板语言,所以还需要jinjia2模板语言。

  4. 由Paramiko,PyYAML和Jinjia2三个关键模块。

  5. no agents:部署简单,不需要在被管控主机上安装任何客户端;

  6. no server:无服务器端,使用时直接运行命令即可;

  7. modules in any languages:支持自定义模块,基于“模块”完成各种“任务”,支持各种可使用任意语言开发模块;

  8. yaml,not code:使用yaml语言定制剧本playbook;

  9. ssh by default:,使用SSH协议并基于SSH工作(基于密钥认证或在inventory文件中指定账号和密码);

  10. strong multi-tier solution:可实现多级指挥。

ansible的任务执行流程

  1. 读取配置。
  2. 抓取全量机器&分组列表 – 可从多个静态文件、文件夹、脚本中读取机器,分组及其变关联量信息。
  3. 使用host-pattern过滤机器列表。
  4. 根据参数确定执行模块和配置–从modules目录动态读取,用户可以自行开发模块。
  5. Runner执行返回。
    • Connection环节定义连接方式 => Action阶段机器列表(Lookup plugin Action变量/文件等资源的获取)。
    • Callback plugin各阶段的钩子调用。
  6. 输出结束。
    • Filter plugin过滤算子。
    • Callback plugin各阶段的钩子调用。

实战安装ansible

master端 配置免密钥登录

1
2
3
ssh-keygen -t dsa  ## 生成密钥
ls .ssh/
authorized_keys id_dsa id_dsa.pub

拷贝id_dsa.pub文件到远程主机的authorized_keys中。

1
scp -P 52113 niu@192.168.56.13:~

在slave端配置

1
2
3
4
5
6
mkdir .ssh
mv id_dsa.pub .ssh/
cd .ssh/
cat id_dsa.pub >> authorized_keys
chmod 600 authorized_keys
chmod 700 ~/.ssh

测试本机是否可以正常执行

1
2
3
ssh -p 52113 niu@192.168.56.13
Last login: Mon Jun 4 14:50:09 2018 from 192.168.56.12
[niu@linux-node3 ~18:14:49]$

开始安装ansible服务器端,需要配置epel源

1
2
wget -O /etc/yum.repos.d/epel.repo http://mirrors.aliyun.com/repo/epel-7.repo
yum install ansible -y

开始编辑hosts文件,默认存放在/etc/ansible目录中 vim /etc/ansible/hosts

1
2
3
4
5
[test]
192.168.56.13
[test:vars]
ansible_ssh_user="niu"
ansible_ssh_port=52113

由于我修改了ssh端口,并禁止了root登录,所以我们需要定义登录用户,及ssh端口号。

测试主机是否能够ping通。

1
2
3
4
5
 ansible test -m ping
192.168.56.13 | SUCCESS => {
"changed": false,
"ping": "pong"
}

编写配置文件

ansible config文件查找路径

ANSIBLE_CONFIG (环境变量中的设置)
ansible.cfg (当前目录下的ansiblee.cfg)
~/.ansible.cfg (家目录下)
/etc/ansible/ansible.cfg (全局目录)

常用配置参数

  • transport 默认参数:smart,可选参数 ssh,paramiko ,如果使用smart ansible则会自动选择。
  • remote_user 设置目标计算机的登录用户。如果为空白,它将使用连接插件的默认值,通常是当前正在执行Ansible的用户。
  • remote_port 在远程连接中使用的端口,空白时将使用默认的连接插件。
  • forks 连接远程主机的时候最大开启进程数。
  • stdout_callback 设置默认回调是使用的stdout
  • jinja2_extensions jinja2的扩展参数
  • library 自定义扩展模块地址
  • roles_path ansible role文件的搜索路径使用:隔开。默认配置 ~/.ansible/roles:/usr/share/ansible/roles:/etc/ansible/roles

参考文档

ansible 官方文档
Ansible入门
Ansible中文权威指南
Ansible5:常用模块
ansible超详细使用指南
ansible实践
ansible-first-book

报错汇总

报错一:提示sudo命令将要被停止。

1
2
[DEPRECATION WARNING]: The sudo command line option has been deprecated in favor of the "become" command line arguments. This
feature will be removed in version 2.6. Deprecation warnings can be disabled by setting deprecation_warnings=False in ansible.cfg.
1
2
3
4
5
6
7
8
9
10
11
12
[root@linux-node2 ~14:12:01]#ansible -s test -m file -a 'path=/tmp/test-niu state=touch'
192.168.56.13 | SUCCESS => {
"changed": true,
"dest": "/tmp/test-niu",
"gid": 0,
"group": "root",
"mode": "0644",
"owner": "root",
"size": 0,
"state": "file",
"uid": 0
}

解决办法: -s 替换成–become

1
2
3
4
5
6
7
8
9
10
11
12
ansible test -m file -a 'path=/data/app/1.txt state=touch' --become
192.168.56.13 | SUCCESS => {
"changed": true,
"dest": "/data/app/1.txt",
"gid": 0,
"group": "root",
"mode": "0644",
"owner": "root",
"size": 0,
"state": "file",
"uid": 0
}

格式错误

1
fatal: [linux-node2]: FAILED! => {"changed": false, "checksum": "823af87241d8f906a4c23d6e0f90aebf9620ccc3", "msg": "Unsupported parameters for (copy) module: user Supported parameters include: attributes, backup, checksum, content, delimiter, dest, directory_mode, follow, force, group, local_follow, mode, original_basename, owner, regexp, remote_src, selevel, serole, setype, seuser, src, unsafe_writes, validate"}

原始文件

1
2
- name: config dns server
template: src=resolv.conf dest=/etc/resolv.conf mode=644 user=root group=root

解决办法

1
2
- name: config dns server
template: src=resolv.conf dest=/etc/resolv.conf mode=644 owner=root group=root

执行提示字符编码不对

1
ERROR! Unexpected Exception, this is probably a bug: 'ascii' codec can't decode byte 0xe6 in position 8: ordinal not in range(128)

因为inventory 里面编写了一个中文的md文档,导致的报错。
将中文文档移除,问题解决。

pstree 命令更优雅的树状显示

Linux pstree命令将所有行程以树状图显示,树状图将会以 pid (如果有指定) 或是以 init 这个基本行程为根 (root),如果有指定使用者 id,则树状图会只显示该使用者所拥有的行程。

在Linux系统中,系统调用fork可以创建子进程,通过子shell也可以创建子进程,Linux系统中进程之间的关系天生就是一棵树,树的根就是进程PID为1的init进程。

命令参数

1
2
3
4
5
6
7
8
9
10
11
12
13
14
15
16
17
18
19
20
21
22
23
24
25
26
27
pstree: unrecognized option '--help'
Usage: pstree [ -a ] [ -c ] [ -h | -H PID ] [ -l ] [ -n ] [ -p ] [ -g ] [ -u ]
[ -A | -G | -U ] [ PID | USER ]
pstree -V
Display a tree of processes.

-a, --arguments 显示命令参数
-A, --ascii 使用 ASCII 画线
-c, --compact 不压缩相同的子进程
-h, --highlight-all 高亮现在执行的程序
-H PID, --highlight-pid=PID 高亮指定的程序
-g, --show-pgids 显示进程组ID; implies -c
-G, --vt100 使用 VT100 画线
-l, --long 不截断长的行
-n, --numeric-sort 按照pid进行排序
-N type,
--ns-sort=type 用程序识别码排序(ipc, mnt, net, pid, user, uts)。预设是以程序名称来排序;
-p, --show-pids 显示pid; implies -c
-s, --show-parents 显示进程的父ID
-S, --ns-changes 显示 namespace 信息
-u, --uid-changes 显示 用户 名称
-U, --unicode 使用 UTF-8 (Unicode) 画线
-V, --version 显示版本
-Z,
--security-context 显示 SELinux 内容
PID start at this PID; default is 1 (init)
USER show only trees rooted at processes of this user

示例

以树状图只显示进程的名字,且相同进程合并显示: pstree

1
2
3
4
5
6
7
8
9
10
11
12
13
14
15
16
17
18
19
20
21
22
23
24
25
26
27
28
[root@node1 ~]# pstree
systemd─┬─NetworkManager─┬─dhclient
│ └─2*[{NetworkManager}]
├─VBoxService───8*[{VBoxService}]
├─agetty
├─auditd───{auditd}
├─chronyd
├─containerd───10*[{containerd}]
├─crond
├─dbus-daemon
├─gssproxy───5*[{gssproxy}]
├─irqbalance
├─keepalived───2*[keepalived]
├─kube-apiserver───8*[{kube-apiserver}]
├─kube-controller───7*[{kube-controller}]
├─kube-proxy───7*[{kube-proxy}]
├─kube-scheduler───9*[{kube-scheduler}]
├─kubelet───13*[{kubelet}]
├─polkitd───6*[{polkitd}]
├─rpc.statd
├─rpcbind
├─rsyslogd───2*[{rsyslogd}]
├─sshd───sshd───sshd───bash───sudo───su───bash───pstree
├─supervisord───etcd───7*[{etcd}]
├─systemd-journal
├─systemd-logind
├─systemd-udevd
└─tuned───4*[{tuned}]

以树状图显示进程同时还显示PID:pstree -p

1
2
3
4
5
6
7
8
9
10
11
12
13
14
15
16
17
18
19
20
21
22
23
24
25
26
27
28
[root@node1 ~]# pstree -p
systemd(1)─┬─NetworkManager(2494)─┬─dhclient(2530)
│ ├─{NetworkManager}(2509)
│ └─{NetworkManager}(2512)
├─VBoxService(2316)─┬─{VBoxService}(2318)
│ ├─{VBoxService}(2319)
│ ├─{VBoxService}(2320)
│ ├─{VBoxService}(2321)
│ ├─{VBoxService}(2322)
│ ├─{VBoxService}(2326)
│ ├─{VBoxService}(2327)
│ └─{VBoxService}(2328)
├─agetty(506)
├─auditd(414)───{auditd}(415)
├─chronyd(455)
├─containerd(910)─┬─{containerd}(943)
│ ├─{containerd}(944)
│ ├─{containerd}(945)
│ ├─{containerd}(946)
│ ├─{containerd}(987)
│ ├─{containerd}(1017)
│ ├─{containerd}(1034)
│ ├─{containerd}(1150)
│ ├─{containerd}(1151)
│ └─{containerd}(1312)
├─crond(505)
├─dbus-daemon(452)
... 省略部分结果

以树状图显示进程PID为的进程以及子孙进程,如果有-p参数则同时显示每个进程的PID:pstree [-p]

1
2
3
4
5
6
7
8
[root@node1 ~]# pstree -p 918
etcd(918)─┬─{etcd}(930)
├─{etcd}(931)
├─{etcd}(932)
├─{etcd}(948)
├─{etcd}(952)
├─{etcd}(1057)
└─{etcd}(1072)

以树状图显示进程,相同名称的进程不合并显示,并且会显示命令行参数,如果有-p参数则同时显示每个进程的PID。pstree -a

1
2
3
4
5
6
7
8
9
10
11
12
13
pstree -a -p 910
containerd,910 --config /data/apps/containerd/containerd-config.toml
├─{containerd},943
├─{containerd},944
├─{containerd},945
├─{containerd},946
├─{containerd},987
├─{containerd},1017
├─{containerd},1034
├─{containerd},1150
├─{containerd},1151
└─{containerd},1312
...省略部分结果

注:因为pstree输出的信息可能比较多,所以最好与more/less配合使用,使用上下箭头查看,按q退出。pstree -p | less

参考文档

pstree命令
linux每日命令(34):ps命令和pstree命令

更新yum源

1
2
3
4
mv /etc/yum.repos.d/CentOS-Base.repo /etc/yum.repos.d/CentOS-Base.repo.backup
wget -O /etc/yum.repos.d/epel.repo http://mirrors.aliyun.com/repo/epel-7.repo
wget -O /etc/yum.repos.d/CentOS-Base.repo http://mirrors.aliyun.com/repo/Centos-7.repo&& \
echo "set aliyun OK ....." ||echo "yum update error ....."

安装基础软件

1
yum install -y tree nmap sysstat lrzsz dos2unix wget vim lsof ntpdate iotop iftop screen zabbix-agent salt-minion

优化开机启动项

centos6 优化开机启动项

1
chkconfig --list |grep 3:on |awk '{print $1}' |egrep -v "sshd|network|crond|rsyslog"|sed -rn 's#(.*)#chkconfig \1 off#gp'|bash

centos7 优化开机启动项

1
2
3
systemctl list-unit-files |grep enabled |awk '{print $1}' |egrep -v "sshd.service|rsyslog.service|crond.service"| sed -rn 's#(.*)#systemctl disable \1 #gp' |bash
# 如果使用rc.local 需要坚持rc-local启动项
systemctl list-unit-files |grep rc-local.service

关闭selinux配置

1
2
cp /etc/selinux/config /etc/selinux/config.bak
sed 's#SELINUX=enforcing#SELINUX=disabled#g' /etc/selinux/config.bak >/etc/selinux/config

优化SSH配置

1
2
3
4
5
6
7
8
9
sed -i 's/GSSAPIAuthentication yes/#GSSAPIAuthentication yes/g' /etc/ssh/ssh_config
sed -i "s/Port 22/#Port 22/g" /etc/ssh/sshd_config
cat >>/etc/ssh/sshd_config<<EOF
Port 52113
PermitRootLogin no
PermitEmptyPasswords no
UseDNS no
GSSAPIAuthentication no
EOF
  • 修改SSH的默认端口。
  • 禁止root登录。
  • 优化SSH连接速度。

配置普通用户登录

创建普通用户,并加入到sudo中。

1
2
3
id niu || useradd niu
echo "123456" |passwd niu --stdin
echo "niu ALL=(ALL) ALL" >>/etc/sudoers

配置时间更新

1
2
3
4
cat >>/var/spool/cron/root<<EOF
time sync by niu at 2010-2-1
*/10 * * * * /usr/sbin/ntpdate pool.ntp.org >/dev/null 2>&1
EOF

修改文件描述符

1
echo '*  -  nofile  65535' >> /etc/security/limits.conf

关闭登录显示服务器信息

1
2
3
## close Login Information
> /etc/issue
> /etc/issue.net

关闭防火墙

关闭centos6的防火墙

1
2
/etc/init.d/iptables stop
chkconfig iptables off

关闭centos7的防火墙

1
2
systemctl stop firewalld
systemctl disable firewalld

补充知识

vmware克隆虚拟机后网卡无法启动问题

第一步:修改克隆后虚拟机的网卡mac地址
第二步:执行如下脚本

1
2
3
4
5
cat /etc/sysconfig/network-scripts/ifcfg-eth0
sed -i '/UUID/d' /etc/sysconfig/network-scripts/ifcfg-eth0
sed -i '/HWADDR/d' /etc/sysconfig/network-scripts/ifcfg-eth0
>/etc/udev/rules.d/70-persistent-net.rules
reboot

制作密钥对

1
2
3
4
5
6
7
8
9
10
11
12
13
14
15
16
17
18
19
20
21
22
# ssh-keygen -t dsa  ##创建密钥对使用dsa加密
Generating public/private dsa key pair.
Enter file in which to save the key (/niu/.ssh/id_dsa): ##指定key存放位置,可以直接回车。
Created directory '/root/.ssh'.
Enter passphrase (empty for no passphrase): ##输入密钥锁,可以直接回车。
Enter same passphrase again:
Your identification has been saved in /niu/.ssh/id_dsa.
Your public key has been saved in /niu/.ssh/id_dsa.pub.
The key fingerprint is:
64:47:0d:9c:ab:8f:1e:7e:5a:b0:25:64:55:23:06:3a niu@centos6.7-mupan
The key's randomart image is:
+--[ DSA 1024]----+
| .o*=o |
| . +o... |
| E = .. |
| * .. |
| S.. |
| .= |
| oo. |
| ..oo |
| .+o |
+-----------------+

在服务器上安装公钥并设置权限

1
2
3
4
cd .ssh/
cat id_dsa.pub >> authorized_keys
chmod 600 authorized_keys
chmod 700 ~/.ssh

编辑/etc/ssh/sshd_config启用密钥登录

1
2
RSAAuthentication yes
PubkeyAuthentication yes

将公钥下载到客户端,然后使用公钥登录

haproxy简介

HAProxy提供高可用性、负载均衡以及基于TCP和HTTP应用的代理,支持虚拟主机,它是免费、快速并且可靠的一种解决方案。HAProxy特别适用于那些负载特大的web站点,这些站点通常又需要会话保持或七层处理。HAProxy运行在当前的硬件上,完全可以支持数以万计的并发连接。并且它的运行模式使得它可以很简单安全的整合进您当前的架构中, 同时可以保护你的web服务器不被暴露到网络上。

haproxy的优势

  • 专门做反向代理负载均衡
  • 有八种以上的负载均衡算法
  • 性能大于等于 nginx
  • 支持动态管理,通过haproxy的sock进行通信,可以进行管理。
  • 有比较丰富的dashboard页面。
  • 有比较强大的七层功能。

haproxy实战

haproxy基础环境准备

实验环境

主机名 ip address 操作系统
linux-node1.example.com 192.168.56.11 centos7
linux-node2.example.com 192.168.56.12 centos7

安装EPEL及基础软件包

1
2
rpm -ivh http://mirrors.aliyun.com/epel/epel-release-latest-7.noarch.rpm
yum install -y gcc glibc gcc-c++ make screen tree lrzsz

使用两个Apache的8080端口作为后端真实服务器

linux-node1.example.com

1
2
3
4
5
6
[root@linux-node1 ~]# yum install -y httpd
[root@linux-node1 ~]# sed -i 's/Listen 80/Listen 8080/g' /etc/httpd/conf/httpd.conf
[root@linux-node1 ~]# systemctl start httpd
[root@linux-node1 ~]# echo "linux-node1.example.com" > /var/www/html/index.html
[root@linux-node1 ~]# curl http://192.168.56.11:8080/
linux-node1.example.com

linux-node2.example.com

1
2
3
4
5
6
[root@linux-node2 ~]# yum install -y httpd
[root@linux-node2 ~]# sed -i 's/Listen 80/Listen 8080/g' /etc/httpd/conf/httpd.conf
[root@linux-node2 ~]# systemctl start httpd
[root@linux-node2 ~]# echo "linux-node2.example.com" > /var/www/html/index.html
[root@linux-node2 ~]# curl http://192.168.56.12:8080/
linux-node2.example.com

让本机服务器监听非本机的IP

1
2
3
vim /etc/sysctl.conf
net.ipv4.ip_nonlocal_bind = 1
sysctl -p

Haproxy源码编译安装

1
2
3
4
5
6
7
8
9
10
[root@linux-node1 ~]# cd /usr/local/src
[root@linux-node1 src]# wget http://www.haproxy.org/download/1.6/src/haproxy-1.6.3.tar.gz
[root@linux-node1 src]# tar zxf haproxy-1.6.3.tar.gz
[root@linux-node1 src]# cd haproxy-1.6.3
[root@linux-node1 src]# make TARGET=linux2628 PREFIX=/usr/local/haproxy-1.6.3
[root@linux-node1 src]# make install
[root@linux-node1 ~]# cp /usr/local/sbin/haproxy /usr/sbin/
[root@linux-node1 ~]# haproxy -v
HA-Proxy version 1.6.3 2015/12/25
Copyright 2000-2015 Willy Tarreau <willy@haproxy.org>

Haproxy启动脚本

1
2
3
[root@linux-node1 ~]# cd /usr/local/src/haproxy-1.6.3
[root@linux-node1 haproxy-1.6.3]# cp examples/haproxy.init /etc/init.d/haproxy
[root@linux-node1 haproxy-1.6.3]# chmod 755 /etc/init.d/haproxy

Haproxy配置文件

1
2
3
4
[root@linux-node1 ~]# useradd -r haproxy
[root@linux-node1 ~]# mkdir /etc/haproxy
[root@linux-node1 ~]# mkdir /var/lib/haproxy
[root@linux-node1 ~]# mkdir /var/run/haproxy

haproxy日志文件配置

haproxy默认使用系统的 local3.* 来存储日志

1
2
3
4
5
vim /etc/rsyslog.conf

local3.* /var/log/haproxy.log

systemctl restart rsyslog.service

haproxy配置文件解读

haproxy的配置文件分为五大块

  • global (全局)
  • defaults (默认)
  • listen (监听的配置)
  • frontend (前端)name vip
  • backend(后端)name server 列表

下面来分别讲解各个配置文件的定义

global (全局)

1
2
3
4
5
6
7
8
9
10
global ##定义这是全局配置
log 127.0.0.1 local3 info
###全局的日志配置,使用log关键字,指定使用127.0.0.1上的syslog服务中的local0日志设备,记录日志等级为info的日志。
chroot /var/lib/haproxy
##使用chroot的模式运行haproxy
user haproxy
group haproxy
##设置运行haproxy的用户和组,可以使用uid gid 关键字代替。
daemon
##以守护进程的方式运行

defaults (默认)

1
2
3
4
5
6
7
8
9
10
11
12
13
14
15
16
17
defaults
##defaults模块标识
log global
##使用global中定义的日志
mode http
##mode 语法: mode{http|tcp|health} , http是七层模式,tcp是四层模式,health是检查检测。返回OK。
option httplog
##启用日志记录HTTP请求,默认haproxy日志记录是不记录HTTP请求的,只记录“时间[jan 5 13:23:46] 日志服务器[127.0.0.1] 实例名以及PID [haproxy[25218]] 信息[proxy http 80 in stoped]” ,日志格式很简单。
option dontlognull
##启用该项,日志中将不会记录空连接,所谓空连接就是在上游的负载均衡器或者监听系统为l探测该服务是否存活可用时,需要定期的连接或者获取某一股东的组件或页面,或者探测扫描端口是否在监听或开放等动作被称为空连接。官方文档中标注,如果该服务上游没有其他的负载均衡器的话,建议不要使用该参数。因为互联网上的恶意扫描或其他动作就不会被记录。

timeout connect 5000
##设置成功连接到一台服务器的最长等待时间。默认单位是毫秒,新颁布的haproxy使用timeout connect 代替。该参数向换兼容。
timeout client 50000
##设置连接客户端发送数据时的成功连接最长等待时间,默认单位是毫秒。
timeout server 50000
##设置服务器端回应客户端数据发送的最长等待时间,默认单位是毫秒

listen (监听页面的配置)

1
2
3
4
5
6
7
8
9
10
11
12
13
listen stats
##定义页面监控的名称
mode http
##http的7层模式
bind 0.0.0.0:8888
##服务器监听端口
stats enable
##开启状态模块
stats uri /haproxy-status
##状态模块的URI
stats auth haproxy:haproxy
##状态模块登录的用户名和密码

frontend (前端)name vip

1
2
3
4
5
6
7
8
frontend http_front
#定义前端的名称
bind *:80
#服务器对外监听的端口,类似于lvs的vip端口
stats uri /haproxy?stats
#状态页面定义
default_backend http_back
#对应的后端服务名称

backend(后端)name server 列表

1
2
3
4
5
6
7
8
9
10
11
12
backend http_back
#后端服务的名称
balance roundrobin
#定义轮询算法,roundrobin 轮询,source 源IPhash,leastconn 最小连接数,这里只列举了常用的三个。

option forwardfor header X-REAL-IP
option httpchk HEAD / HTTP/1.0
##haproxy的健康检查,如果这两行被禁用,就是四次检测。
server web-node1 192.168.56.11:8080 check inter 2000 rise 30 fall 3
server web-node2 192.168.56.12:8080 check inter 2000 rise 30 fall 3
##后端真实ip配置,check 表示开启健康检查,inter 2000ms 每隔多长时间检查一次,rise 30 服务可用的连续次数,连续30次可用,在把你加进来,fall 3 失败三次 就把你踢出去。

完整的haproxy配置文件

1
2
3
4
5
6
7
8
9
10
11
12
13
14
15
16
17
18
19
20
21
22
23
24
25
26
27
28
global
log 127.0.0.1 local3 info
chroot /var/lib/haproxy
user haproxy
group haproxy
daemon

defaults
log global
mode http
option httplog
option dontlognull
timeout connect 5000
timeout client 50000
timeout server 50000

frontend http_front
bind *:80
stats uri /haproxy?stats
default_backend http_back

backend http_back
balance roundrobin
option httpchk GET /index.html
option httpchk GET /
server linux-node1 192.168.56.11:8080 check
server linux-node2 192.168.56.12:8080 check

haproxy的ACL控制。

推荐生产上不要使用ACL访问控制。所有这里就没有研究。如果感兴趣的可以自行百度。

haproxy动态管理

方法一:

可以listen模式中开启stats admin if TRUE #开启页面管理 通过图形界面管理服务器上下线。

方法二:

使用socat 管理haproxy服务器。

1
2
3
4
5
6
7
8
9
10
11
12
13
14
15
16
17
18
19
#在global开启socket
global
stats socket /var/run/haproxy.sock mode 600 level admin
stats timeout 2m
#安装socat管理软件
yum install socat
使用socat管理haproxy
socat /var/run/haproxy.sock stdio
基本用法:
echo "help"| socat stdio /var/run/haproxy.sock #socat常用命令
echo "show info "| socat stdio /var/run/haproxy.sock # 显示dashboad 的信息。
echo "show pools "| socat stdio /var/run/haproxy.sock #显示内部资源池的状态
echo "show stat "| socat stdio /var/run/haproxy.sock # 显示前后端服务器的状态

echo "set maxconn"| socat stdio /var/run/haproxy.sock #修改最大连接数
echo "disable server backend_www_example_com/web-node2 "| socat stdio /var/run/haproxy.sock # 关闭 web-node2 的服务器
echo "disable server backend_www_docker_nginx/docker-web2 "| socat stdio /var/run/haproxy.sock # 关闭 web-node2 的服务器
echo "enable server backend_www_docker_nginx/docker-web2 "| socat stdio /var/run/haproxy.sock # 开启 web-node2 的服务器

0%